
Avoiding Data Loss during OST to PST Conversion: Best Practices and Precautions
Table of Contents
OST to PST conversion is essential to migrate mail data from Offline mailbox items (ost), such as emails, contacts, notes, tasks, appointments, etc. from one MS Outlook profile to another. Also, it helps to move the mailbox items to Microsoft 365 (Office 365) or a new Exchange Server. But before converting OST to PST file, it is important to know the preventive measures that should be followed to avoid data loss during OST conversion.
Table of Contents
In this tutorial guide, I will discuss the best practices to avoid the OST file data loss situation during conversion. Also, I’ll mention the excellent OST PST converter tool to convert your OST file into a PST file safely & successfully.
So, let’s get started…
Essential Tips to Avoid Data Loss During OST Conversion
Here are some of the tips to ensure a smooth & successful OST conversion process:
- Create a Backup of your Crucial Data
Before starting an Outlook file conversion, it is important to create a backup of your original OST file & save it in a safe location. This ensures that if your data gets inaccessible during the file conversion procedure, you still have an extra copy of your file to access later.
- Close MS Outlook
It is very important to close Microsoft Outlook before the conversion process. Running the Outlook application during conversion may lead to conflicts & potential data corruption.
- Use a Copy of an OST File
Don’t use the original .ost file to perform the conversion process, use a copy of that file to get your job done. In case, if something goes wrong, then your original data remains intact.
- Monitor the Process
During file conversion, keep an eye on the procedure. If you notice any errors or unusual behavior, you can stop the process to avoid severe damage to your data.
- Use the Most Reliable Software
It is important to choose the most reliable and trustworthy OST for the PST tool. Before using any converter software, you must read the software’s reviews you intend to use. Also, avoid using unverified tools, as they might compromise your data or result in data loss during OST file conversion.
- Ensure Stable System
Make sure your operating systems are stable before you start the conversion process. An unstable system or sudden system shutdown can increase the risk of errors during .ost conversion.
- Conversion of large OST File Size
Large or oversized OST files can be susceptible to errors during the conversion. If the OST file is too large, then it’s a challenging task to convert it to PST and another file format. So considering reliable and trustful tools such as Stellar Converter for OST is most recommended for safe data conversion.
- Consider Professional Assistance
If you are unsure about performing the OST to PST conversion yourself, then seek the help of an IT professional or expert service provider.
Use the Reliable OST PST Converter Software to Convert OST to PST
An OST PST converter tool, such as Stellar Converter for OST comes in handy when we need to successfully convert large OST files to PST. It has the ability to convert inaccessible/orphaned .OST files to .PST files fruitfully. Apart from PST, it can convert OST to other formats as well, such as MSG, HTML, EML, PDF, etc.
This feature-loaded software can convert every mailbox item, such as emails, attachments, contacts, calendars, and more.
Therefore, download & install this software on your computer to perform the OST conversion.
How to Use Stellar Converter for OST Tool:
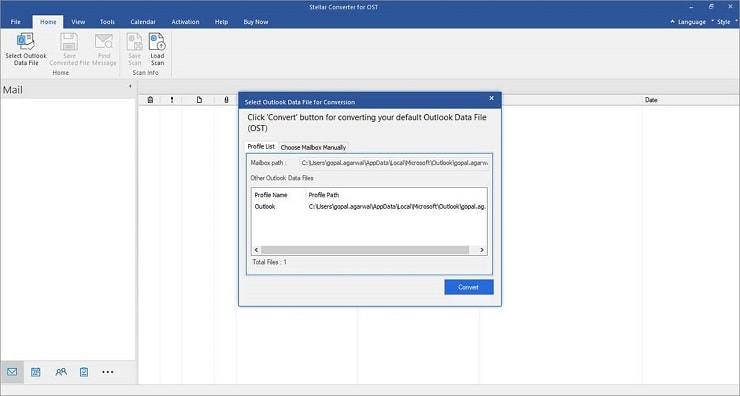
Step 1- Open Stellar Converter for OST. Go to the Home tab to click on Select Outlook OST. Then, a popup box will appear on your screen to List Profiles or Choose Mailbox Manually.
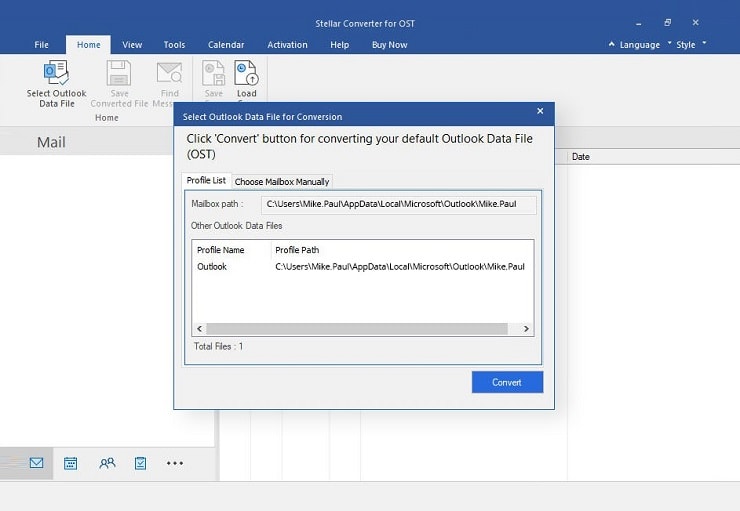
Step 2- If you have to choose the Profile List option, then it will display all the OST files configured with the Outlook profile. Simply, choose the OST file that you want to convert from the list >> click the Convert button. You can also click on Choose Manually in order to browse manually.
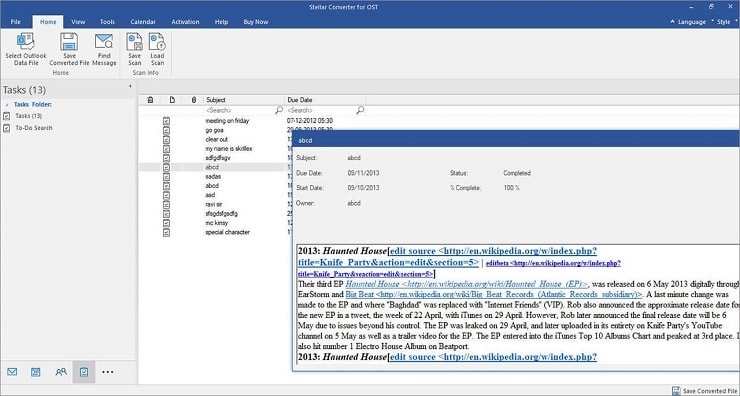
Step 3- Once the conversion process is over, the program previews the Outlook mail items in the Left pane. Click on the mailbox items to preview them >> select the mail items to save them.
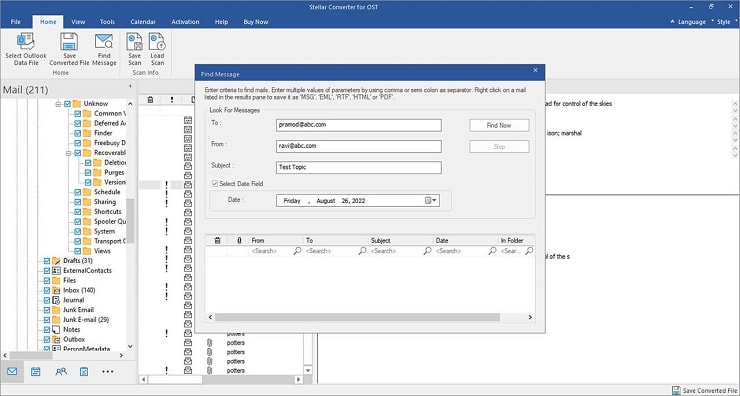
Step 4- You can use Find Message to search the emails using several search parameters, like ‘From,’ ‘To,’ ‘Subject,’ ‘Date,’ etc., & save them separately or in the group.
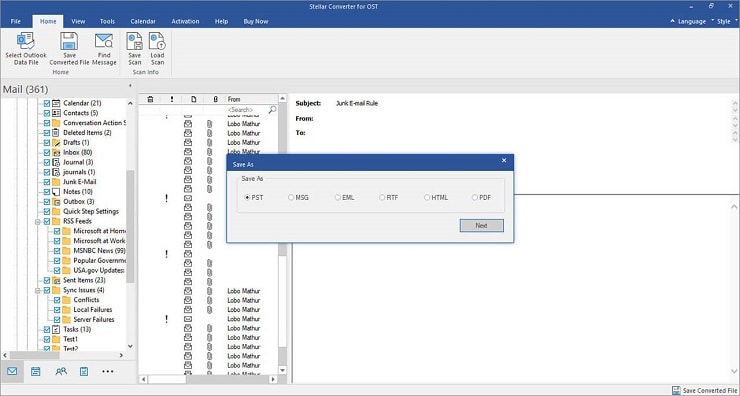
Step 5- Again, go to the ‘Home’ tab >> click on Save Converted File. Now, a popup box will appear on your screen to save extracted mailbox data in various file formats. Choose PST >> click Next.
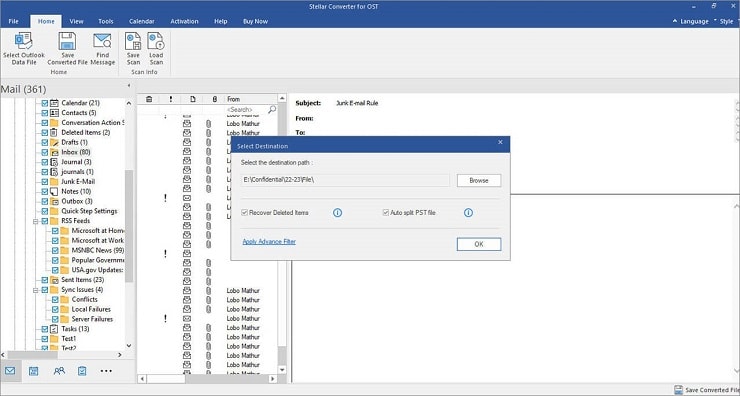
Step 6- Click on Browse to select the location to save the file >> Select/unselect the options “Restore Deleted items” & “Auto split PST file” based on your requirements. You can even click on the Apply Advanced Filter link in order to apply the filters >> click OK.
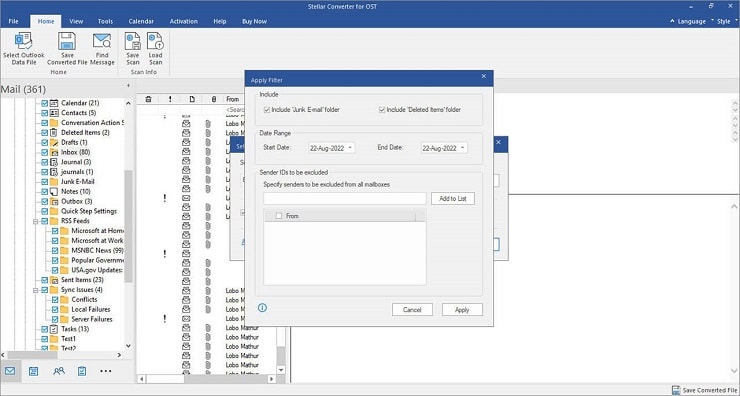
Step 7- Lastly, click on Apply Advanced Filter to open a new popup box. Here, you have to choose options to exclude or include the mailbox items based on the email ID and date range.
And you are done!
To Sum Up
Above, I have discussed the precautionary tips that should be followed to avoid data loss during OST conversion. By following these precautionary measures, you can minimize the risk of data loss & ensure smoother OST file conversion.
However, for safe and successful OST to PST conversion, it is suggested to use an advanced OST to PST tool, as Stellar Converter OST mentioned in this post.
Thanks for reading!